Increase ROI from Drift Chatbots with Experimentation: A Step-by-Step Guide

Becca Bruggman
The marketing toolkit is ever expanding and chatbots are currently exploding, especially in the B2B space. Here at Optimizely we recently have begun using Drift chatbots. Like us, many companies today are using chatbots on their website as a way to engage in real-time with customers and prospects. This allows salespeople to connect faster, support to unblock customers faster and marketing to present content to customers at the right time and in the right place, in a personalized, conversational way.
Are you wanting to get even more value out of the chatbots you’ve created with Drift? Do you want to know which bots perform best to different segments of your customers or on different pages? Combining the power of Optimizely and Drift allows you to unlock the answers to these questions.
As the Program Manager for Experimentation and Optimization at Optimizely I became interested in answering these questions for myself and our company. So, I moved forward with building a Drift integration with Optimizely using Extensions, which you can think of as re-usable experiment variation templates. This means you won’t need to touch any to get up and running with experimenting on your Drift chatbots! Though if you’re interested, I’ve included the code snippets below.
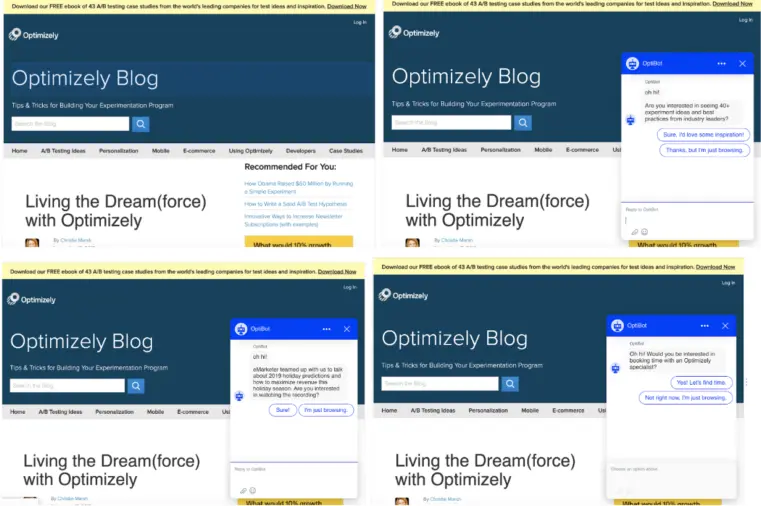
We just launched our own series of Drift chatbot experiments on our blog, and plan to share back our learnings once we have more data. Here are what the variations look like for one of the experiments:
Here are the steps we will walk through in this post:
- Set-up your Playbooks in Drift
- Create an Extension in Optimizely to easily deploy Drift in experiment variations
- Do one-time event tracking set-up for all Drift chatbots
- Create your experiment variations with the Drift Extension
- Build your Audiences in Optimizely
- QA and launch your experiment!
Alright, let’s get into the set-up!
++++++++++++++++++++++++++++++
Set-up your Playbooks in Drift
First, let’s set-up the playbooks you want to test in the Drift UI. I’d recommend having at least 3 per experiment so that you have a good number of variations to test. Also, please note that this integration depends on Drift Links, which are only available on Drift Pro plans or above.
After creating the Playbooks in Drift, click on the “Drift Link” tab in the top navigation:

Next, check the box that says, “Only fire when DriftLink is present,” and copy only the number in the Driftlink code snippet to save for later:

Note: After checking the box, you will not be able to do targeting in Drift, so all targeting will be done in Optimizely. There is a ton of flexibility for targeting in Optimizely and I’ll note a few especially interesting ones below!
Create an Extension in Optimizely to easily deploy Drift in experiment variations
Next, we will use an Optimizely Extension to activate Drift within a variation in an experiment. An Extension allows you to create a template for anything that you might repeat across multiple experiments. For example, you might have a modal on your website where the design stays the same, but what you are promoting within it changes, i.e. just the text, links and images. An Extension is useful here as you can create the baseline modal design and create an interface to make changes to the text, images and links without having to interact with the code powering the modal.
Extensions can be used when building experiments as a “variation template” and are useful in situations like this, where the baseline code for the variation is similar and only specific components are changing. For us, we have been using the same code to activate the chatbot each time, the only thing changing is which chatbot we are showing, based on the Drift ID we will pass to the Extension.
To get the Extension, navigate to the Optimizely Extension Library and get the Drift Chatbot Experiment Extension here [link] or copy the JSON code below:
{ "plugin_type": "widget", "name": "Drift Bot Activation", "edit_page_url": "www.optimizely.com", "form_schema": [ { "default_value": 0, "field_type": "number", "name": "drift_id", "label": "Drift ID", "options": null } ], "description": "Activate a Drift bot with just the ID of the bot", "options": { "apply_js": "var utils = window[\"optimizely\"].get(\"utils\");\n\nutils.waitUntil(function() {\n return (typeof(drift) !== 'undefined');\n}).then(function() {\n drift.on('ready',function(api, payload) {\n // activate playbook\n drift.api.startInteraction({ interactionId: Number(extension.drift_id) });\n \t\n });\n});\n\n\n\n\n\n", "html": "", "css": "", "undo_js": "" } }
If you’re curious what code is under the hood or prefer to activate Drift directly in the variation as opposed to using the Extension, you can find the activation code is below. This is useful if you want to make modifications to the integration as opposed to using the out-of-box version or do not have access to Extensions within your current Optimizely plan.
// define optimizely utility library
var utils = window["optimizely"].get("utils");

// waituntil drift is defined on the page
utils.waitUntil(function() {
 return (typeof(drift) !== 'undefined');
}).then(function() {
 drift.on('ready',function(api, payload) {
   // activate playbook
   drift.api.startInteraction({ interactionId: });
 });
});
Next, log-in to Optimizely to create your Extension within the UI. You can find Extensions by navigating to Home > Implementation > Extensions.
From there, click “Create New…” and select the second item “Using JSON”. Paste the Extension code from the library or code box above and Save.

One-time event tracking set-up for all Drift chatbots
How are we going to analyze which Drift chatbot is performing best? We’ll do so by sending events back to Optimizely as the user interacts with the Chatbot on our site, so we will need to get those events set-up before launching our first experiment. This will be done via a *ONE TIME SET-UP* of event tracking that can be leveraged for all Drift Chatbot experiments moving forward.
Step 1: Add Custom Events to Shared Javascript Code by adding the following code snippet to Shared Javascript Code. At a high level, this code checks to see if a user has interacted with the Drift chatbot in real time and sends those events back to Optimizely to be included in experiment results.
// // define optimizely utility library
var utils = window["optimizely"].get("utils");

// waituntil drift is defined on the page
utils.waitUntil(function() {
  return (typeof(drift) !== 'undefined');
}).then(function() {
  drift.on('ready',function(api, payload) {

	// clicked default conversation response buttons in drift
	window.drift.on("conversation:buttonClicked", function(data) {
	  console.log("user clicked a button with text: " + data.buttonBody);
	  window['optimizely'].push({
		type: "event",
		eventName: "drift_convo_btn_click"
	  });
	});

	// first interaction with playbook tracking
	// response in text box or text button click
	window.drift.on("conversation:firstInteraction", function(data) {
	  console.log("First interaction: " + JSON.stringify(data));
	   window['optimizely'].push({
		type: "event",
		eventName: "drift_first_convo"
	  });
	});

	// user closes side bar
	window.drift.on('sidebarClose', function (e) {
	   console.log('sidebar close', JSON.stringify(e));

	   // set session storage to not re-activate drift in same session
	   sessionStorage.setItem(“drift_sidebar_close”, “clicked”)

	   window['optimizely'].push({
		type: "event",
		eventName: "drift_sidebar_close"
	  });
	});

	// user re-opens sidebar
	 window.drift.on('sidebarOpen', function (e) {
	   console.log('sidebar open', JSON.stringify(e));
		window['optimizely'].push({
		type: "event",
		eventName: "drift_sidebar_open"
	  });
	 });

	// email captured
	window.drift.on("emailCapture", function(e) {
	  console.log("user identified as: " + e);
	   window['optimizely'].push({
		type: "event",
		eventName: "drift_email_capture"
	  });
	});

	// meeting booked
	window.drift.on("scheduling:meetingBooked", function(data) {
	  console.log("user booked a meeting with " + data.teamMember.name);
	   window['optimizely'].push({
		type: "event",
		eventName: "drift_meeting_booked"
	  });
	});
  });
});
Step 2: Add custom events in Optimizely UI for each event being tracked in the Project JavaScript code. Navigate to Implementation > Events then click “Create New Event…” in the upper right corner and select the “Custom” radio button.
From there you will create 6 total Custom Events. You can give them any “Name” that works best for your organization, however, “API Name” must match the name of the custom event in the code above, each of which is:
- drift_convo_btn_click
- drift_first_convo
- drift_sidebar_close
- drift_sidebar_open
- drift_email_capture
- drift_meeting_booked

Create your experiment variations with the Drift Extension
Next, create your experiment! This will be like any other experiment you would set-up in Optimizely. So, from Home, click “Create Experiment”, select your Experiment name and give your Experiment a Name, Description and URL to target where you want to the Drift Chatbot to run.
From there, you can click on the Variations and add your Drift Chatbot Extension by clicking “Create” and then selecting the “Drift Bot Activation” Extension in the left side rail.
Get the DriftLink ID for the playbook you created earlier that you want to activate (as shown in the first step of this tutorial) and paste it into the input field for the Extension then click Save.
You can add as many variations with different Chatbots that you want to experiment with as desired!
Next, click “Variations” in the upper left hand corner to navigate back to the main screen for the Experiment. From there, click “Metrics” in the left side navigation and search for the Driftbot specific metrics you defined earlier. Add all the ones you want to track within this specific experiment.

Build your Audiences in Optimizely
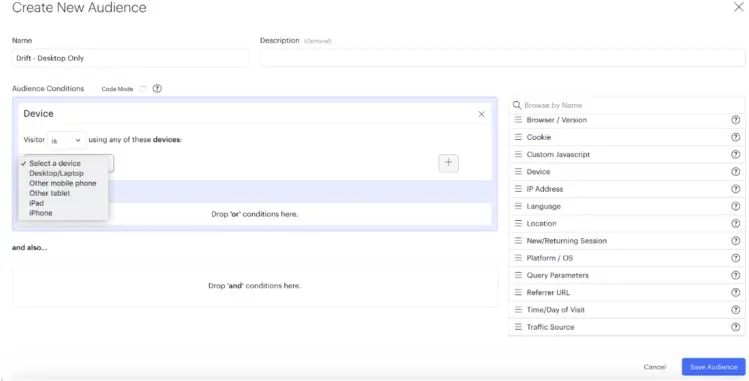
Optimizely offers a lot of flexibility in terms of Audience targeting, a few that would be especially interesting for your Drift experiments:
- Desktop or Mobile Only (Device)
- Select “Device” from drag and drop on right
- Select from dropdown which type of Device to target
- Have Drift Chatbot activate only once per session
- Select “Custom Javascript” from drag and drop on right
- Paste !sessionStorage.getItem(‘drift_sidebar_close’) in input box
- This checks for a value in the users browser to see if they have closed the Drift chatbot in this session

- Have Drift Chatbot activate for only New or Returning Visitors
- Select “New/Returning Session” from drag and drop on right
- Select “is new” or “is returning” from dropdown

- Have Drift Chatbot activate during a specific time of day
- Select “Time of Day” from drag and drop on right
- Select specific days and times you want your Drift chatbot to show to the visitor

There are many, many more options for how to target your Drift chatbots in Optimizely, but the above are a few great ones to start thinking about.
QA and launch your experiment!
Finally, QA your experiment and you’re ready to launch. You’ll start to see the results come in to Optimizely for your different chatbots and how they are performing with your users.
I’d love to hear what chatbots you’re experimenting with on your different pages. Please comment below or tweet me @bexcitement.
Ready to level up your experimentation practice? Reach out to us today.
About the author