Wie hosten Sie ein virtuelles Experiment zur Ideenfindung?

"Die besten Ideen entstehen, wenn sehr unterschiedliche Perspektiven aufeinandertreffen." -Frans Johansson
Steckt Ihr Experiment-Programm in einem Trott fest?Sind die Testideen auf Ihrer Roadmap spärlich oder sehr einseitig? Brauchen Sie ein wenig mehr Kreativität und Inspiration, um den Wert des Programms zu steigern?Wenn ja, sind dies alles wichtige Indikatoren dafür, dass Sie eine Experiment-Ideationssitzung einberufen sollten.
Wie können also virtuelle Ideensitzungen für Experimente helfen?Sie widmen sich einer bestimmten Zeit und einem virtuellen Raum, um:
- sich ganz auf Ihre Benutzer oder Besucher zu konzentrieren
- Sammeln Sie einzigartige Perspektiven von verschiedenen Personen
- Kreativität und Engagement im Team zu fördern
Insgesamt ermöglichen sie Ihnen, innovative neue Ideen zu entwickeln, die sonst nicht möglich gewesen wären, wenn sie einzeln in isolierten Räumen durchgeführt worden wären.In diesem Artikel zeige ich Ihnen in zwei Teilen, wie ich mit Kunden von Optimizely produktive virtuelle Ideensitzungen durchgeführt habe, indem ich (a) die erforderlichen Tools und die Einrichtung und (b) eine Schritt-für-Schritt-Anleitung für den Moderator anspreche.
Einrichten
Es gibt zahlreiche Software-Optionen, mit denen Sie das persönliche Whiteboard, an das sich Ihr Team vielleicht gewöhnt hat, virtuell nachbilden können.Die Möglichkeiten reichen von einfach (mit Google Slide) bis zu robusteren und speziell entwickelten Plattformen wie Mural und Miro.
Um loszulegen, müssen Sie Ihre Ideationssitzung vorbereiten, indem Sie einige grundlegende Tools auswählen und einrichten:
- Virtuelles Whiteboard - Für die Benutzerfreundlichkeit ist es hilfreich, über einen großen virtuellen Raum zu verfügen, der das Schwenken/Zoomen und eine einfache Navigation ermöglicht.Eine leere PowerPoint-/Präsentationsfolie ist in diesem Fall nicht ausreichend.

Ein gut nutzbares und umfangreiches virtuelles Whiteboard in Mural.
- Ideenfindungsrahmen - Ein von Ihnen gewählter Rahmen, der dabei hilft, die Ideen zu organisieren, das Gespräch zu strukturieren und neue Ideen hervorzubringen.Je nach den Ideen, die Sie sammeln möchten, oder dem Problem, das Sie zu lösen versuchen, können Sie Ihren eigenen Rahmen festlegen.Einige beliebte Rahmen, die wir bei Optimizely für unsere Kunden verwenden, sind:
- Problem Solution Result - Ein universeller Ansatz zur Generierung von Ideen für Experimente, der zunächst auf der Identifizierung und Qualifizierung eines Nutzerproblems beruht. Allzu oft sehe ich Ideen für Experimente, die auf "Ahnungen" und nicht unbedingt auf Daten beruhen. Nachdem das Problem identifiziert wurde, werden die Teilnehmer gebeten, ein Brainstorming über die vielen möglichen Lösungen durchzuführen und diese dann nach ihrer Wirkung (z.B. der Fähigkeit, das Problem zu lösen) zu ordnen.Diese Elemente können dann auf Ihrem Whiteboard in Form einer Experimentier-Leinwand festgehalten werden, die Sie gemeinsam ausfüllen können. Dies ist im Allgemeinen ein sehr universeller Ansatz, der sich auf alle Aspekte der Erlebnisse Ihrer Benutzer oder Besucher anwenden lässt.Weitere Einzelheiten finden Sie in dem Beitrag meines Kollegen über die Durchführung eines Hypothesen-Workshops, der auf diesem Rahmen basiert.
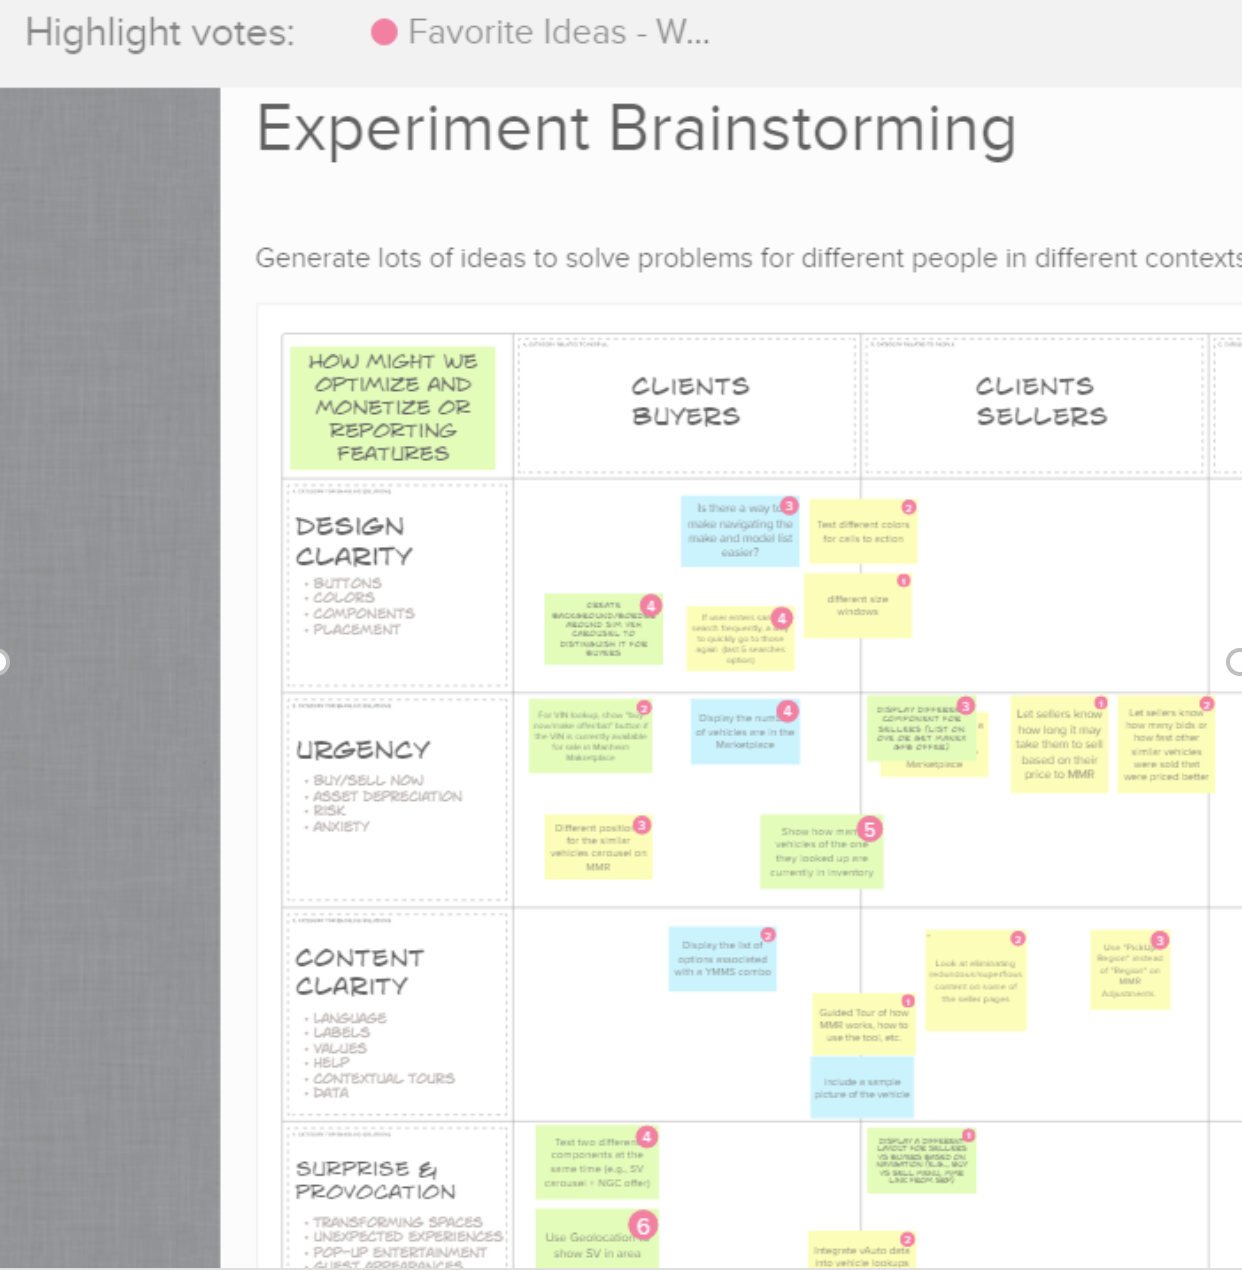
- Kreativ-Matrix - Dieser Ansatz legt Wert auf divergentes Denken, indem er die Quantität der Ideen über die Qualität der Ideen in einer explorativen Weise fördert.Im Mittelpunkt steht ein Geschäftsproblem, das als "Wie könnten wir...?"-Frage formuliert wird (z.B. "Wie könnten wir Besucher dazu ermutigen, unser Produkt/Preiskonzept zu erkunden?)Zeilen und Spalten werden dann in ein Raster eingezeichnet, wobei jede Spalte ein Kundensegment (z.B. neue Besucher, wiederkehrende Besucher usw.) oder sogar eine Persona (Student, Small Business Owner, Unternehmen) bezeichnet.Jede Zeile im Raster steht für eine bestimmte Technik, eine Lösung oder ein Wertversprechen (mehr dazu im Leitfaden für Moderatoren weiter unten).
- Virtuelle Haftnotizen/Karten - Wenn Sie ein gemeinsames Whiteboard verwenden, sind Karten, die für jeden Teilnehmer eine eigene Farbe haben, hilfreich für die Nachvollziehbarkeit und zur Erleichterung der Diskussion.
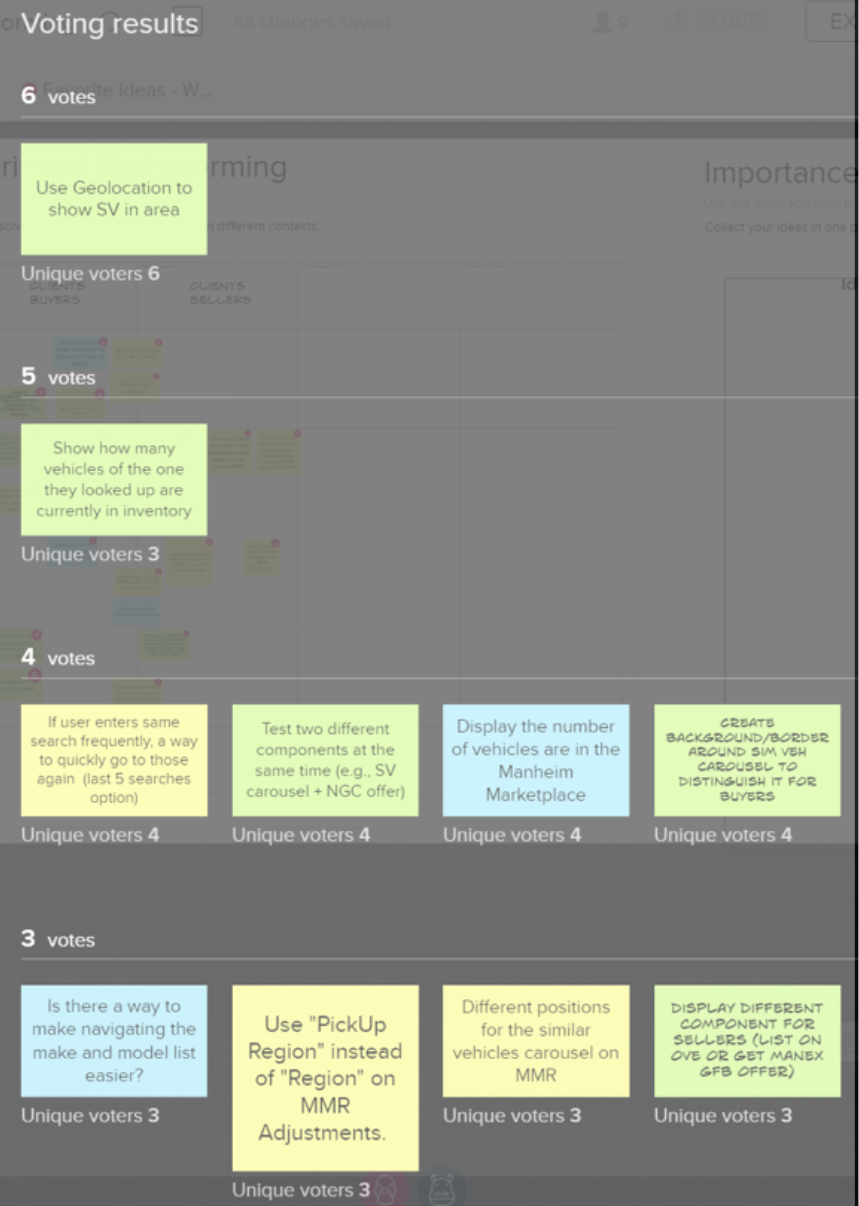
- Gruppenabstimmung - Es wird eine Zeit geben, in der Sie über Ihre Ideen abstimmen können (wir werden den Prozess noch erläutern). Mir gefällt die Art und Weise, wie Mural demonstriert, dass Sie einem Teilnehmer eine beliebige Anzahl von Stimmen zuweisen können, um die Ideen zuzuordnen, die ihm am besten gefallen. Wenn Sie ein allgemeineres Whiteboard verwenden (z.B. Google Slides), können Sie die Stimmen auch mit Punkten darstellen und manuell abzählen.
MURAL verfügt über Funktionen zur Abstimmung über Ideen und zur Anzeige der Ergebnisse direkt auf den Karten.
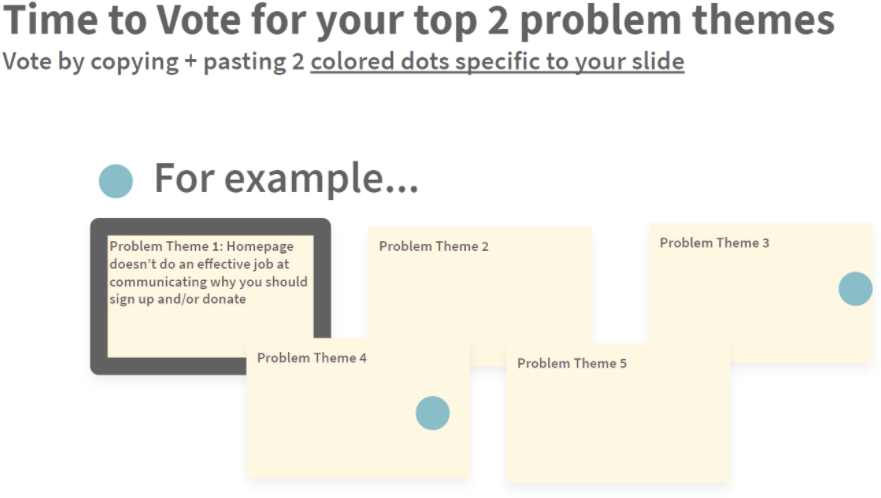
Anstelle einer robusten Plattform für die Zusammenarbeit können Sie die Abstimmungsergebnisse auch durch Punkte oder Formen in einer Google Folie darstellen.
- Timer - Wir sollten die Whiteboard-Sitzung mit einer Zeitangabe versehen.Es muss nichts Ausgefallenes sein, aber etwas, das jeder sehen kann, ist nützlich, wie der visuelle Countdown-Timer in den Suchmaschinenergebnissen von Google.
- Exportierbar - Da die Ideen umgesetzt werden müssen, muss das Ergebnis unserer Sitzung in einem Format exportiert werden, das gemeinsam genutzt werden kann und das für spätere Zwecke zur Verfügung steht (z.B. PDF, Bilddatei, das virtuelle Whiteboard selbst usw.) Es ist auch hilfreich, wenn externe Stakeholder wieder Zugang zum Whiteboard erhalten können, ohne sich anmelden zu müssen.
(Tipp: Viele Whiteboard-Plattformen können Freigabelinks erstellen, die an externe Stakeholder gesendet werden können, ohne dass eine individuelle Anmeldung erforderlich ist.Dies ist hilfreich, um Begeisterung für den Workshop zu wecken und führt zu Folgesitzungen, was ein Vorteil einer virtuellen Sitzung ist).
Durchführung der virtuellen Sitzung:Schritt-für-Schritt-Leitfaden für Moderatoren
Nun, da wir alle virtuellen Werkzeuge zur Verfügung haben, sollten wir uns überlegen, wie wir den virtuellen Workshop moderieren. Bei Optimizely bezeichnen wir unsere Ideen-Workshops als Hypothesen-Workshops, denn das Ziel ist eine Sammlung von Hypothesen, die in eine Roadmap für Tests einfließen können.Da wir nun wissen, was dabei herauskommt, lassen Sie uns Schritt für Schritt vorgehen, um sicherzustellen, dass Sie selbst einen produktiven Hypothesen-Workshop durchführen können, angefangen bei der Tagesordnung.
Eine gute Ausgangsbasis für eine Tagesordnung ist:
- Einführung und Definition der Problemstellung - 5 Min.
- Individuelles Brainstorming - 5 Minuten pro Problem (widerstehen Sie dem Drang, dies zu lange auszudehnen - die Begrenzung auf einen kürzeren Zeitraum ermöglicht es, dass die besten Ideen an die Oberfläche kommen und die Teilnehmer nicht versuchen, nach obskuren Ideen zu "greifen")
- Vorlesen der Ideen - 10 Minuten (hängt stark von der Anzahl der Teilnehmer ab, es wird empfohlen, die Anzahl der Ideen auf fünf zu begrenzen, um die Moderation zu erleichtern und die Anzahl der zu diskutierenden Ideen zu begrenzen)
- Gruppenabstimmung - 5 Min.
- Prioritätensetzung - 10 Minuten
- Formulierung der Hypothese - 10 Min.
Lassen Sie uns aufschlüsseln, wie wir uns auf jede dieser Aktivitäten vorbereiten und sie durchführen:
Vorarbeit und Problemdefinition
Es kann sein, dass Sie einige Vorarbeiten leisten müssen, um die Teilnehmer auf der Softwareplattform, die Sie zum Hosten des virtuellen Whiteboards verwenden, einzuladen.Manchmal ist eine leichte Einführung erforderlich, und viele Softwareanbieter bieten ein selbstgesteuertes Onboarding an, so dass ich empfehle, dass sich die Teilnehmer vorher anmelden und sich mit dem Erlebnis vertraut machen.
Stellen Sie sicher, dass Sie in der Einladung zur Sitzung die Problemstellung definieren, für die wir Hypothesen/Lösungen entwickeln.Dabei sollte es sich um ein Benutzerproblem handeln, das spezifisch genug ist, mit einem geschäftlichen KPI zusammenhängt und keine Lösung an sich darstellt.Sehen Sie sich diese Beispiele für die Formulierung des perfekten Benutzerproblems an.
Es kann einige Vorbereitungssitzungen mit den wichtigsten Stakeholdern erfordern, um die wichtigsten Benutzerprobleme festzulegen, auf die Sie sich konzentrieren wollen. Ich habe sogar schon ganze Workshops erlebt, die nur der Problemdefinition gewidmet waren (ja, es ist so wichtig zu wissen, wofür Sie eine Lösung finden wollen!)
Wenn Sie einen Creative Canvas-Link verwenden, ist es hilfreich, Kategorien für jede der Ideen/Lösungen zu haben (Design Clarity, Content Clarity, Urgency usw.).Und es ist auch eine weitere Spalte, wenn es mehrere Benutzergruppen oder Interessengruppen gibt, die von dem Problem betroffen sind.
Einleitung
Beginnen Sie mit einer Einführung in den Zweck dieser Sitzung.Ich finde es gut, wenn Sie zunächst das "Warum" beantworten (Warum ist dies wichtig?, Warum jetzt?), dann das "Wie" (Wie wird die Sitzung ablaufen?, Wie werden wir Ideen sammeln?) und dann zum "Was" übergehen (Wie lautet die Problemstellung?).
Nutzen Sie diese Zeit auch, um alle FUDs (Angst, Unsicherheit, Zweifel) der Teilnehmer anzusprechen. Dies ist der richtige Zeitpunkt, um alle Bedenken bezüglich des Prozesses zu zerstreuen.Häufige Zweifel, die ich von Teams höre, sind: "Woher weiß ich, dass meine Idee ernst genommen und nicht ignoriert wird?" oder "Ich habe Ideen, die viel Veränderung und Aufwand erfordern, sollte ich diese auch äußern?"
Im Allgemeinen verwende ich gerne den Rahmen der "kreativen Matrix", um den Brainstorming-Prozess zu steuern.
Individuelles Brainstorming
Stellen Sie einen Timer ein und geben Sie der Brainstorming-Aktivität einen Zeitrahmen (5 oder 10 Minuten).Dieser Teil der Aktivität ist individuell und gibt den Teilnehmern die Möglichkeit, ihre eigenen Ideen auf die "Tafel" zu schreiben, ohne dass die Gruppe sie davon abhält, was sie für eine gute Idee halten.
Erinnern Sie die Teilnehmer daran, dass sie sich keine Sorgen machen sollen, wenn sich ihre Ideen mit denen anderer Teilnehmer überschneiden, und dass sie sich noch keine Gedanken über die Granularität der Idee machen sollen - wir werden die Spezifität der Idee später verfeinern. Die Idee sollte aus zwei Komponenten bestehen: die vorgeschlagene Lösung und eine Begründung (entweder qualitativ oder quantitativ), warum diese Lösung das Problem lösen würde.
Teilen und diskutieren Sie die Ideen
Lesen Sie die Ideen eine nach der anderen vor und regen Sie eine Diskussion an. Lassen Sie den Ideeneigentümer Fragen klären und Belege dafür vorbringen, warum diese Idee funktionieren würde. Entscheiden Sie, ob die Idee noch detaillierter ausgearbeitet oder in einzelne Ideen zerlegt werden muss.Meine Faustregel: Wenn die Lösung von einem "pizzagroßen Team" umgesetzt werden kann (ein Team, das von einer einzigen Pizza ernährt werden kann), dann hat sie die richtige Größe.
Gruppenabstimmung
Geben Sie den Teilnehmern eine bestimmte Anzahl von Stimmen, mit denen sie angeben können, welche Idee das größte Potenzial zur Lösung des genannten Problems hat.Dies ist keineswegs ein Ersatz für eine umfassende Bewertungsrubrik, die später eingeführt werden kann, wenn diese Ideen in die größere Roadmap aufgenommen werden (unsere Partner bei WiderFunnel verwenden PIE).Sie können auch festlegen, wie viele Stimmen ein Teilnehmer zur Verfügung hat, um seine Stimme abzugeben, und ob er mehrmals abstimmen darf.
Nach der Auszählung der Stimmen kann es sein, dass der Moderator bei der Verteilung der Stimmen denTiebreakerspielen muss.
Aufwand vs. Auswirkung - Priorisierung
In diesem Schritt werden die Teilnehmer ermutigt, den Aufwand für die Umsetzung der Idee gegen die Auswirkungen abzuwägen, die sie auf die Lösung des Problems haben könnte. Dazu können Sie die Karten in eine Matrix einzeichnen, wobei die vertikale Achse von geringem bis hohem Aufwand und die horizontale Achse von links nach rechts von geringer bis hoher Wirkung verläuft.
Nehmen Sie als Gruppe die Top-Ideen (z.B. die Top 5) und fragen Sie die Teilnehmer, wie sie die Ideen auf der unteren Achse nach ihrer Auswirkung ordnen würden (welche hat die höchste Wahrscheinlichkeit, das Problem zu lösen?). Machen Sie dann in einer weiteren Runde dasselbe für den relativen Aufwand.Die Gruppe zu bitten, die Ideen relativ zueinander einzuordnen, ist insofern von Vorteil, als dadurch vermieden wird, eine spezifische Bewertungsrubrik zu definieren, die oft zu pingeligen Diskussionen darüber führen kann, was eine "5" und was eine "4" ist. Es ist für die Teilnehmer einfacher, relative Vergleiche anzustellen, als absolute Punktzahlen zu vergeben.
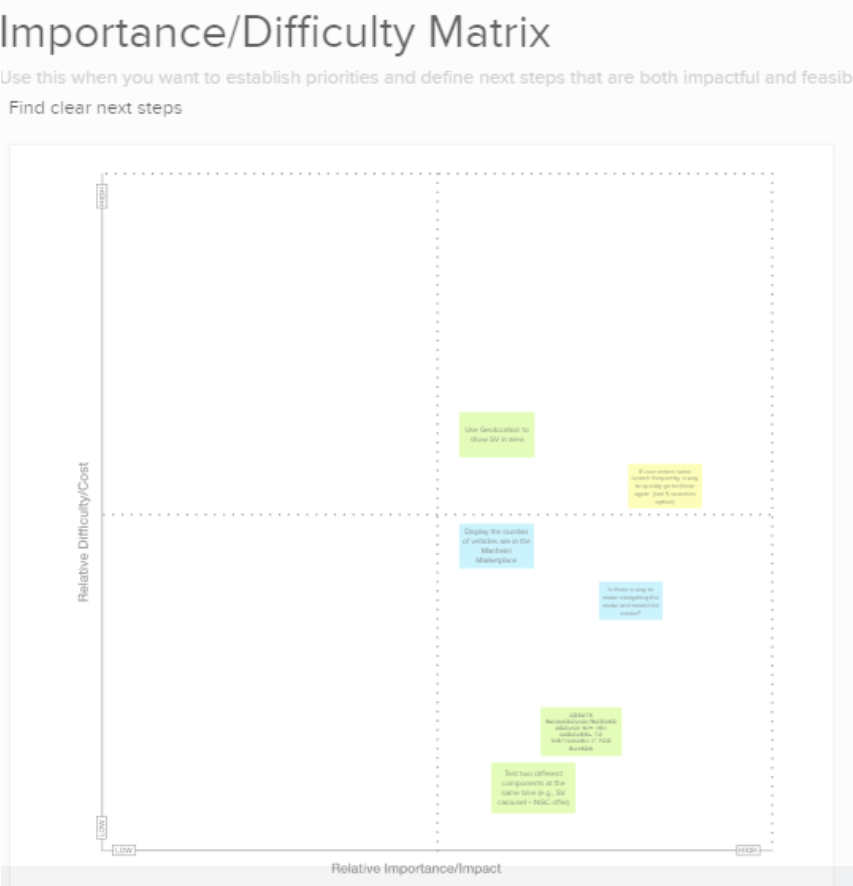
Es ist hilfreich, wenn Sie als Gruppe Ihre Ideen in dieser MatrixAufwand vs. Wirkungaufzeichnen, um die relative Bedeutung zu erkennen.
Formulierung der Hypothese
Nach dem ersten Versuch der Priorisierung von Ideen nehmen Sie die Ideen, die im oberen rechten Quadranten für Ideen mit hoher Auswirkung und geringem Aufwand liegen.Dies sind die Ideen, um die wir als Gruppe eine Hypothese aufstellen können.Wie jede gute Hypothese sollte auch diese in einer einfachen Aussage formuliert werden, die die Lösung, das/die Ergebnis(se) und die Begründung enthält.Zum Beispiel: Wenn wir "X" tun, dann erwarten wir "Y", weil "Z".Auf diese Weise wird "X" natürlich zu Ihrer angegebenen Lösung, "Y" ist Ihre Messgröße und "Z" ist Ihre Begründung.
Die Hypothese kann auf die Erzielung quantitativer Ergebnisse ausgerichtet sein (z.B. Steigerung der Conversions) oder sie kann darauf abzielen, qualitative Erkenntnisse zu gewinnen (z.B. ein Painted Door Test). 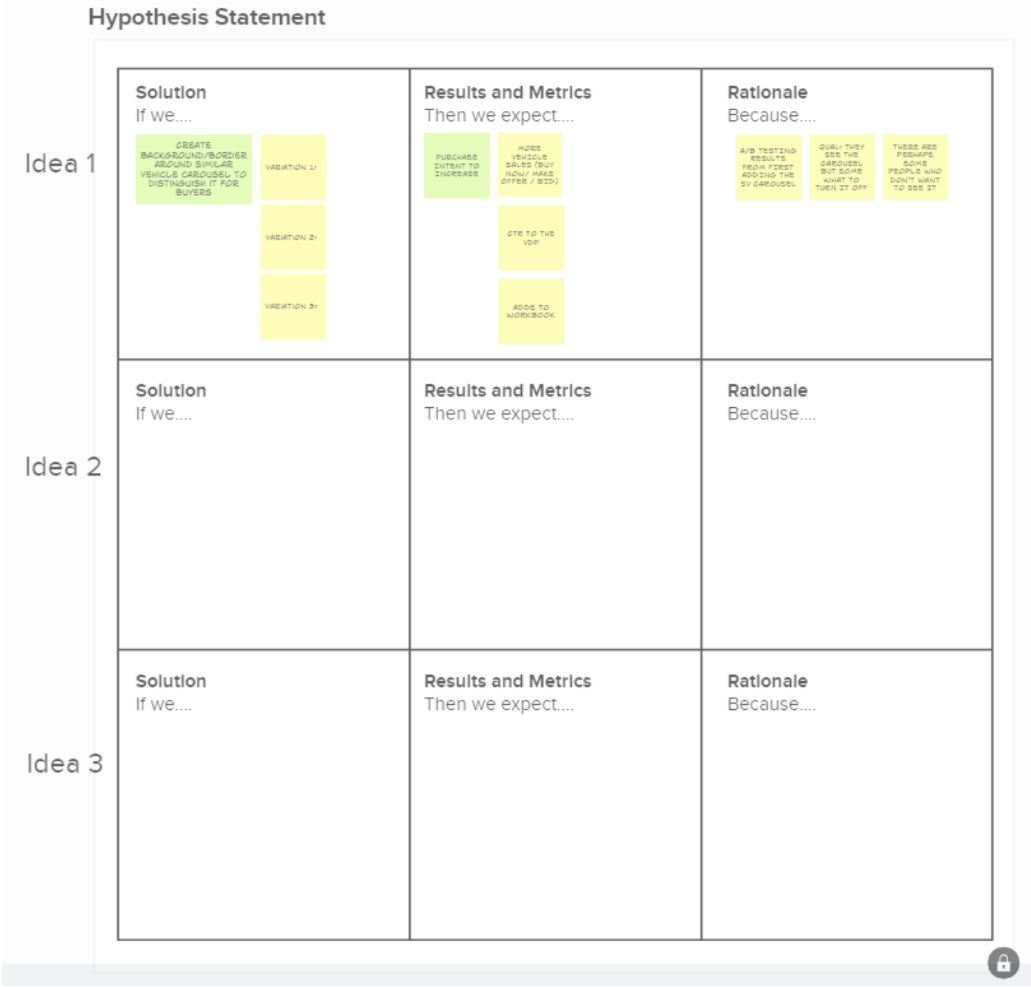 Das Endergebnis der Ideationssitzung sind die besten Ideen, die in einer Hypothese zusammengefasst werden. Mit dieser Hypothese ist es nur noch ein kleiner Schritt, diese Details in einen Testplan einzutragen.
Jetzt, da wir eine vollständig ausgearbeitete Hypothese haben, haben wir das Ziel der Ideensitzung erreicht. Je nach Ihrem bestehenden Prozess können diese neuen Ideen entweder zu einer größeren Roadmap hinzugefügt werden, in der sie ganzheitlich bewertet werden (vielleicht mit einer detaillierteren Bewertungsrubrik), oder sie können so, wie sie sind, grünes Licht erhalten.
Der nächste Schritt wäre, Ihrem bestehenden Prozess des Experimentierens zu folgen, der im Allgemeinen darin besteht, die Idee in einem Testplan detaillierter zu beschreiben, um die Konfiguration des Experiments zu verstehen (z.B. auf welchen Seiten würde dieser Test laufen? Wie werden wir die angegebenen Metriken konfigurieren?Sollen sie als Klick-Ereignisse, Seitenaufrufe oder benutzerdefinierte Ereignisse gemessen werden? usw.).
Nun, da Sie einen erfolgreichen Workshop durchgeführt haben, sollten Sie nicht dabei stehen bleiben.Sie sind nun gewappnet, dies mit weiteren Funktionsteams zu wiederholen, um das High-Impact-Testing in Ihrem Unternehmen voranzutreiben.
Wenn Sie daran interessiert sind, mit Progressive Delivery zu beginnen, können Sie sich für ein kostenloses Optimizely Rollouts Konto anmelden.

Brad ist Mitglied des Produktteams für unsere Experimentieren-Produkte. Er hat das letzte Jahrzehnt damit verbracht, Produkte zu entwickeln und Organisationen dabei...
- Zuletzt geändert: 06.02.2025 18:49:57