Powerful Feature Flags in Swift + iOS

However, building a feature flagging system is usually not your company’s core competency and can be a distraction from other development efforts.
I’m Kody, Developer Advocate at Optimizely. In this 8 step blog post, I’ll show how to get the value of powerful feature flags by rolling out a feature customer-by-customer in Swift + iOS using Optimizely Rollouts: a completely free product.
Note: If you don’t have an iOS application to test with, we recommend following along with the complete source code in the Hello World App.
Bonus Note: I’m also hosting a session on the topic of feature flags for mobile apps.
Steps to roll out a feature
1. Setup the Feature Flag Interface
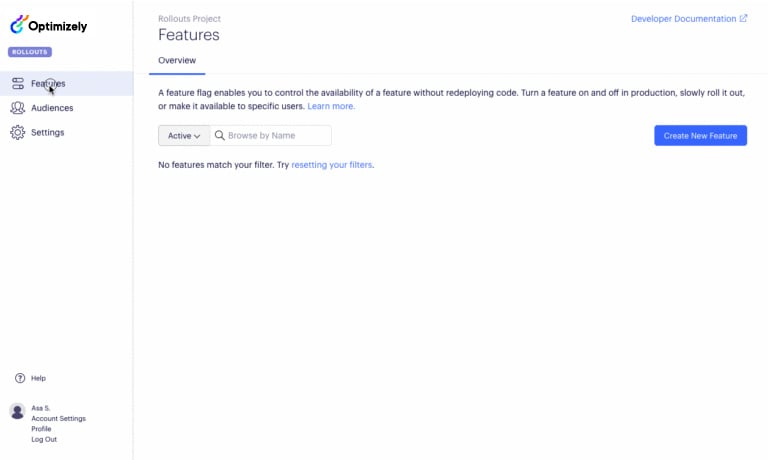
Create a free Optimizely Rollouts account here.
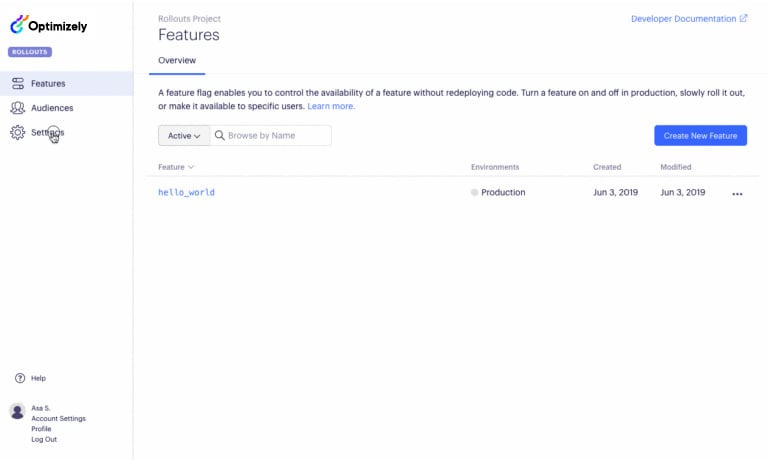
In the Rollouts interface, navigate to ‘Features > Create New Feature’ and create a feature flag called ‘hello_world’.
To connect your ‘hello_world’ feature to your application, find your SDK Key. Navigate to ‘Settings’ and copy the SDK Key value.
2. Install the Optimizely Swift Package
The Optimizely Swift Package allows you to setup feature toggles from within your codebase using Swift. If you don’t already have an Xcode project setup to follow along, create a new single view app in Xcode. Set the app to use Storyboard and set Swift as the language. Now that you have your Xcode project ready, we’ll install the Optimizely SDK.
Using Swift Package Manager
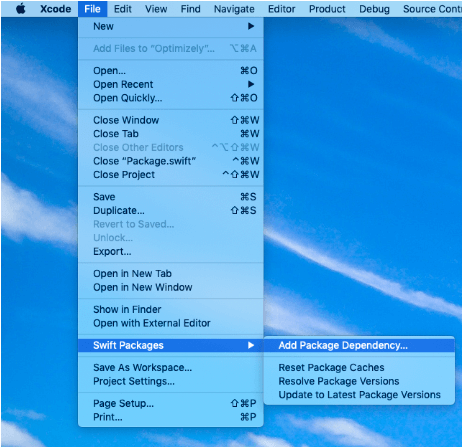
In Xcode click File > Swift Packages > Add Package Dependency
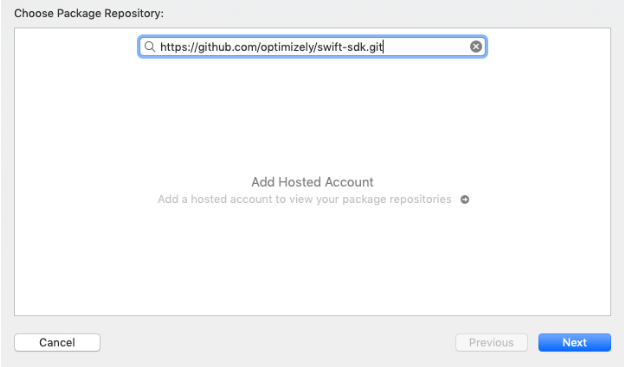
Then paste ‘https://github.com/optimizely/swift-sdk.git’ into the package repository URL field:
Follow the Xcode dialog to complete installation of the Optimizely Swift package.
Initialize the SDK
To use the Optimizely Swift Package first import the package at the top of your AppDelegate.swift file then initialize the SDK in the ‘didFinishLaunchingWithOptions’ function. Replace the code in your AppDelegate.swift file with the code below and remember to paste in your Optimizely SDK Key.
import UIKit
import Optimizely

@UIApplicationMain
class AppDelegate: UIResponder, UIApplicationDelegate {
	// Build OptimizelyClient
	let optimizely = OptimizelyClient(sdkKey: "REPLACE_WITH_SDK_KEY", periodicDownloadInterval: 30)

	func application(_ application: UIApplication, didFinishLaunchingWithOptions launchOptions: [UIApplication.LaunchOptionsKey: Any]?) -> Bool {

		optimizely.start { result in
			switch result {
			case .failure(let error):
			 print("Optimizely SDK initiliazation failed: \(error)")
			case .success:
			 print("Optimizely SDK initialized successfully!")
			}
		}
		return true
	}
}
In this example we are setting the to 30 to make the SDK poll for feature configuration changes every 30 seconds. This is simply to demonstrate the feature toggling more quickly(the default frequency is every 10 minutes).
Note: We do not recommend customizing the download interval unless you have a specific need to.
3. Implement the Feature
To implement our ‘hello_world’ feature, we’ll use Xcode’s Interface Builder to add a single button that presents an alert. We’ll use our feature flag to dictate the contents of the alert.
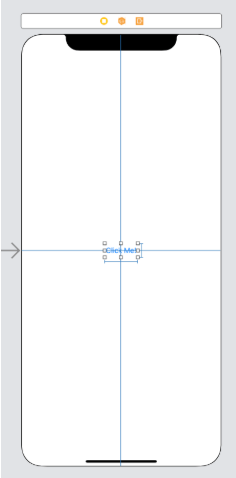
Add the button
Add a button named “Click Me!” to the UI and center it.
Connect the button to the view controller
- Open ViewController.swift
- Copy & paste the code below into the ViewController class.
@IBAction func showMessage(sender: UIButton) {
  var enabled = false

  let alertController = UIAlertController(title: "Alert", message: enabled ? "Hello World!" : "Nothing to see here...", preferredStyle: UIAlertController.Style.alert)

  if enabled {
	  alertController.addAction(UIAlertAction(title: "Hello!", style: UIAlertAction.Style.default, handler: nil))
  } else {
	  alertController.addAction(UIAlertAction(title: "Ok", style: UIAlertAction.Style.default, handler: nil))
  }

  present(alertController, animated: true, completion: nil)
}
Connect the button in the UI to the function above (using storyboard: open Main.storyboard and with the ‘control’ key pressed, click and drag from the button to the view controller icon at the top left of the iPhone. A menu drops down, click showMessageWithSender)’
Connect the button to the “hello_world” feature
Now that we’ve connected the button in the interface to our function in the ViewController.swift, the function will be called whenever the button is clicked. But you may have noticed that in the function there is a variable called ‘enabled’ being used in a ternary expression to toggle the message of the alert as well as the text of the button to dismiss the alert. Follow the steps below to connect to the OptimizelyClient to dynamically set the value of ‘enabled’ based on the userId and the Optimizely feature flag configuration.
- To import the Optimizely client for use in the view controller, paste the following in the ViewController class above the button function:
- let delegate = UIApplication.shared.delegate as! AppDelegate
To use the Optimizely client to set the value of enabled, paste the following in the button function near the top below the enabled variable:let userId = "user123" let attributes: [String: Any] = [ "customerId": 123, // Attributes used for targeted audience-based rollout "isVip": true, ] enabled = delegate.optimizely.isFeatureEnabled(featureKey: "hello_world", userId: userId, attributes: attributes) print("Feature is enabled? - \(enabled) for userId: \(userId)")
The parameters to isFeatureEnabled(featureKey, userId, attributes) are the following:
- featureKey: name of the feature to connect this method to the Optimizely UI.
- userId: used for rolling out to a random percentage of users, we won’t use this parameter in this post, leave as a non-empty string for now.
- attributes: used for a targeted rollout across your users. You will use these attributes to target your feature to specific groups of users starting in step 5.
The return value, isEnabled, is a boolean indicating whether the feature was enabled or not enabled for those inputs.
The full code for our ViewController.swift should now look like the following:
import UIKit
class ViewController: UIViewController {
let delegate = UIApplication.shared.delegate as! AppDelegate
@IBAction func showMessage(sender: UIButton) {
var enabled = false
 let userId = "user123"
 let attributes: [String: Any] = [
	"customerId": 123,   // Attributes used for targeted audience-based rollout
	"isVip": true,
  ]
  enabled = delegate.optimizely.isFeatureEnabled(featureKey: "hello_world", userId: userId, attributes: attributes)
  print("Feature is enabled? - \(enabled) for userId: \(userId)")
let alertController = UIAlertController(title: "Alert", message: enabled ? "Hello World!" : "Nothing to see here...", preferredStyle: UIAlertController.Style.alert)
if enabled {
alertController.addAction(UIAlertAction(title: "Hello!", style: UIAlertAction.Style.default, handler: nil))
} else {
alertController.addAction(UIAlertAction(title: "Ok", style: UIAlertAction.Style.default, handler: nil))
}
present(alertController, animated: true, completion: nil)
}
}
4. Turn the Feature Toggle on!
Press option+command+S to save all files and then click the “build and run” button in the top left to run the app in Xcode. In the iOS simulator click the button to view the alert and you’ll notice that you did not get the hello_world feature. This is because the feature is not enabled, which means it’s off for all users of your app.
To turn on the feature in Optimizely:
- Navigate to Features
- Click on the ‘hello_world’ feature
- Toggle the feature on and ensure it is set to 100% (see screenshot below)
- Click Save to save your changes

Wait 30 seconds then, without restarting your running app, click the “Click Me” button to see the alert present with Optimizely changes having taken effect. The alert should now show the ‘Hello World!’ message indicating the feature is toggled on.
You have now successfully launched your feature behind a feature flag, but it’s available to everyone. The next step is to enable targeting to show your feature only to a specific subset of users to enable the true value of rolling a feature out customer-by-customer.
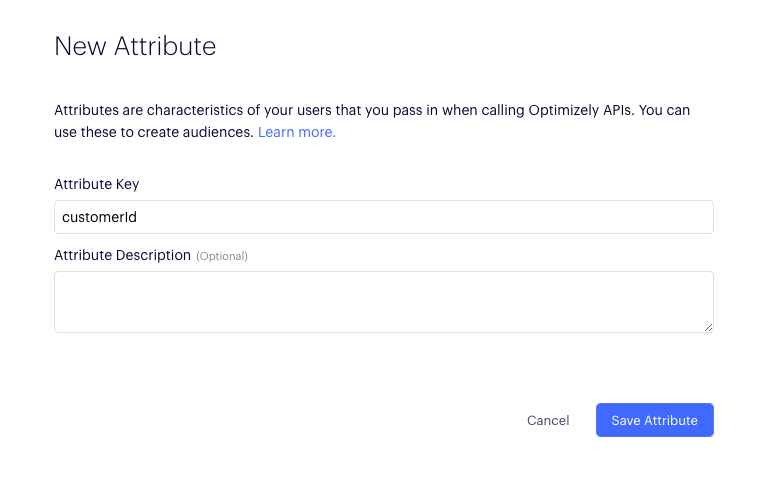
5. Create an attribute for customerId
To target your feature based on the ‘attributes’ you provided to the isFeatureEnabled API in step 3, you’ll have to create those attributes in the Rollouts UI. Do that with the attribute ‘customerId’ to start:
- Navigate to Audiences -> Attributes
- Click ‘Create New Attribute…’
- Name the attribute key ‘customerId’
- Click ‘Save Attribute’ to save your changes
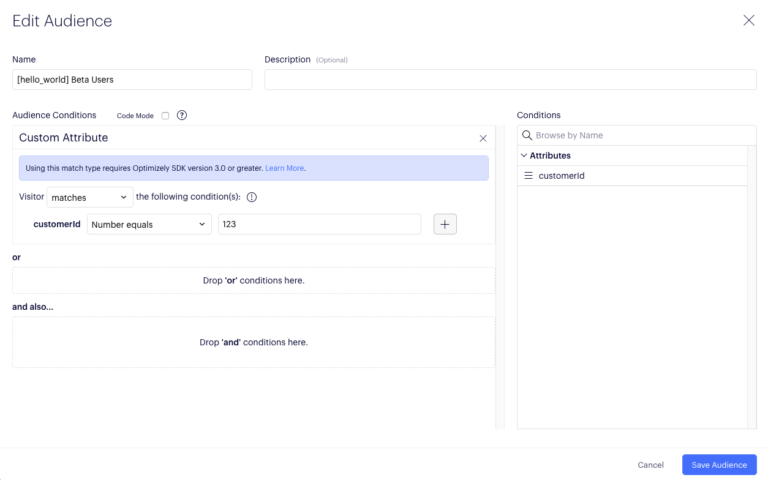
6. Create and add a beta audience
Now let’s create an audience to indicate which customerIds will get access to your feature.
- Navigate to Features
- Click on your ‘hello_world’ feature
- Scroll down to Audiences
- Click ‘Create New Audience…’
- Name the Audience ‘[hello_world] Beta Users’
- Drag and Drop your customerId attribute into the Audience conditions
- Change the ‘has any value’ drop-down to “Number equals” with the value 123
- Click ‘Save Audience’
Add the audience to your feature by clicking the + button next to your newly created Audience. Then scroll down and click ‘save’.
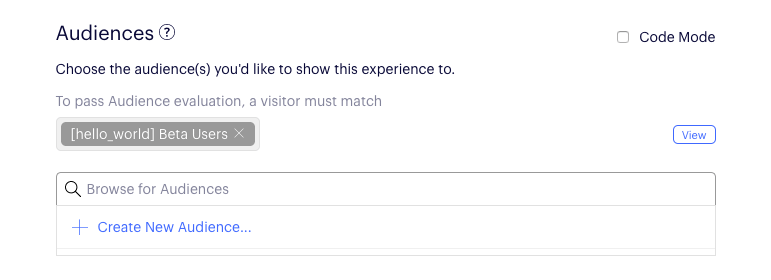
Now that you’ve added the audience to your feature, the beta is up and running. At this point your feature is only showing for customers with the customerId 123, which is what you provided to the isFeatureEnabled API in the userAttributes parameter.
As a test to verify, you can change your customerId to 456, save, and watch as the feature will get turned off because you don’t meet the targeting conditions.
7. Add users to the beta
To add more customers into your beta audience, edit the audience definition to add or remove users from the beta:
- Click on the “+” sign and save to add beta users
- Click on the “x” sign and save to remove beta users
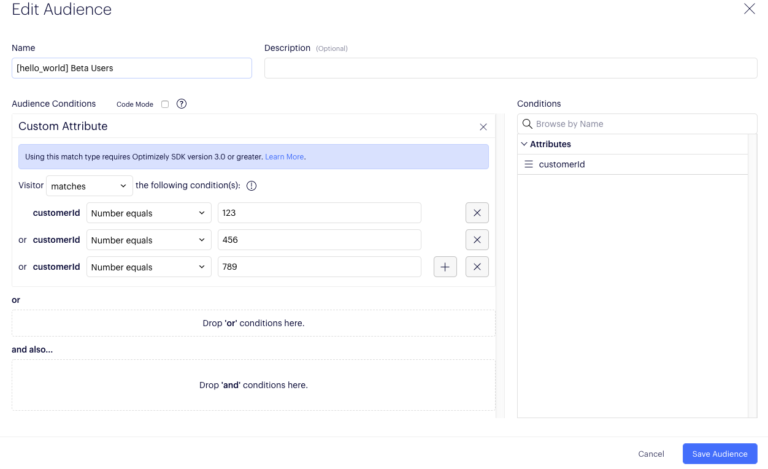
In the following screenshot example, three customers have been added to the beta. Customers with ids: 123, 456, and 789, will now have access to the ‘hello_world’ feature.
8. Launch the feature
After enabling your feature for enough customers to enjoy the new user experience, you may decide that it’s safe to launch your feature to all customers.
Once you are ready to launch your feature out of beta, follow these steps:
- Remove the audience from your feature
- Ensure the rollout is configured to 100%
- Save the feature
The feature is now available to everyone and you have successfully rolled out the ‘hello_world’ feature customer-by-customer using free feature flags from Optimizely Rollouts in Swift + iOS!
9. Bonus: Listen for Feature Flag configuration changes
So far we’ve demonstrated how to bucket users when they take an action in the iOS app. You can also add notification listeners to the Optimizely client to hook into relevant events. For example, you could listen to the “datafileListener” to dynamically change in app content when remote changes are made to the configuration of your features in Optimizely. Call the below function addListeners() before optimizely.start() to add the listeners.
func addListeners() {
		let notificationCenter = optimizely.notificationCenter

			//notification fired when a value is returned by isFeatureEnabled function call
		_ = notificationCenter?.addDecisionNotificationListener(decisionListener: { (type, userId, attributes, decisionInfo) in
			print("Received decision notification: \(type) \(userId) \(String(describing: attributes)) \(decisionInfo)")
		})

			//notification fired when SDK polls for a new datafile and the datafile has changed
		_ = notificationCenter?.addDatafileChangeNotificationListener(datafileListener: { (_) in
			print("data file did change!")
		})
	}
Next Steps
Although this blog covered customer-by-customer rollouts, feature flags enable additional use cases like not relying on long-lived feature branches, creating a permissioning system, or enabling product-driven A/B testing on the backend.
Another benefit of feature flags is that you can turn features on and off once your app is live in the App Store, without having to go through Apple’s lengthy review process!
At Optimizely, we use feature flags for all of these use cases and more.
Hope this was helpful! Give feedback if you have any. I hope I’ve been successful in saving some of your team’s development resources by enabling you to harness the power of feature flags with our free feature flagging product: Optimizely Rollouts.

Kody is a Developer Advocate at Optimizely in San Francisco. A mechanical engineer turned self-taught developer, Kody has worked in the iOS and full-stack communities...
- Last modified: 12/30/2025 8:18:25 PM