Powerful feature flags in React

Feature flags allow you to slowly roll out a feature gradually rather than doing a risky big bang launch and are extremely helpful when used in a continuous integration and continuous delivery environment.
At Optimizely, we commonly use feature flags to reduce the risk of complicated deploys like rebuilding UI dashboards.
However, building a feature flagging system is usually not your company’s core competency and can be a distraction from other development efforts.
I’m Asa, Optimizely’s Developer Advocate. In this 8 step blog post, I’ll show how to get the value of powerful feature flags by rolling out a feature customer-by-customer in React using Optimizely Rollouts: a completely free product.
Note: If you don’t have a React application, we recommend creating one with create-react-app
Steps to roll out a feature
-
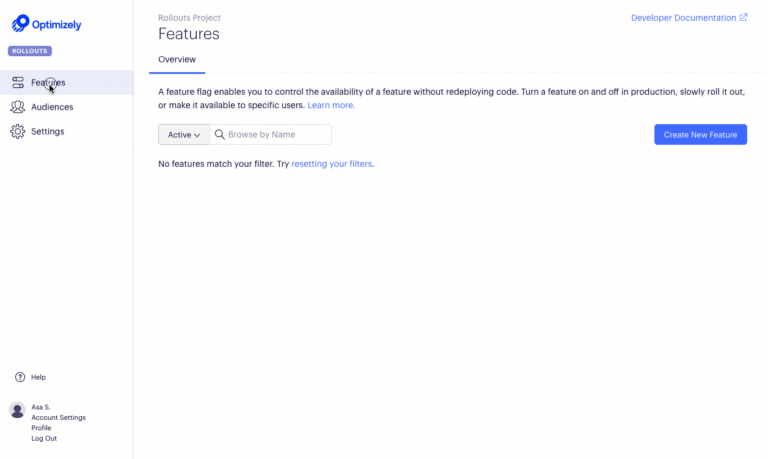
Setup the Feature Flag Interface
Create a free Optimizely Rollouts account here.
In the Rollouts interface, navigate to ‘Features > Create New Feature’ and create a feature flag called ‘hello_world’.
To connect your ‘hello_world’ feature to your application, find your SDK Key. Navigate to ‘Settings > Datafile’ and copy the SDK Key value.
-
Install the Optimizely Rollouts React SDK
The React SDK allows you to setup feature toggles from within your codebase using JavaScript.
Using npm:
>npm install --save @optimizely/react-sdkor using yarn:
>yarn add @optimizely/react-sdkUse the SDK by wrapping your main React App component in the OptimizelyProvider component and replace <Your_SDK_Key> with the SDK key you found above.
import React from 'react';
import {
  createInstance,
  OptimizelyProvider,
} from '@optimizely/react-sdk'

const optimizely = createInstance({
  sdkKey: '<Your_SDK_Key>',
})

class App extends React.Component {
  render() {
	return (
	  <OptimizelyProvider
		  optimizely={optimizely}
		  user={{
			id: 'user123',
			attributes: {
			  'customerId': 123,
			  'isVip': true,
			}
		  }}>
		<h1>Example Application</h1>
		<div>
		  No features here yet...
		</div>
	  </OptimizelyProvider>
	)
  }
}

export default App;
Note that the OptimizelyProvider takes a user object that defines properties associated with a visitor to your website.- user.id: is used for a random percentage rollout across your users
- user.attributes: are used for a targeted rollout across your users. You will use these attributes to target your feature to specific groups of users starting in step 5.
-
Implement the Feature
To implement your ‘hello_world’ feature, first import the OptimizelyFeature component at the top of your application:
class="">import { OptimizelyFeature } from '@optimizely/react-sdk'
Then put the OptimizelyFeature component in the app, passing your feature key ‘hello_world’ to the feature prop of the OptimizelyFeature component:
<OptimizelyFeature feature="hello_world">
  {(isEnabled) => (
	isEnabled
	? (<p> You got the <strong>hello_world</strong> feature! </p>)
	: (<p> You did not get the feature </p>)
  )}
</OptimizelyFeature>
The feature prop connects the component to the feature you created in the Optimizely UI in the first step.
Your full code sample now looks like the following:
import React from 'react'; import { createInstance, OptimizelyProvider, OptimizelyFeature, } from '@optimizely/react-sdk' const optimizely = createInstance({ sdkKey: '<Your_SDK_Key>', }) class App extends React.Component { render() { return ( <OptimizelyProvider optimizely={optimizely} user={{ id: 'user123', attributes: { 'customerId': 123, 'isVip': true, } }}> <h1>Example Application</h1> <div> <OptimizelyFeature feature="hello_world"> {(isEnabled) => ( isEnabled ? (<p> You got the <strong>hello_world</strong> feature! </p>) : (<p> You did not get the feature </p>) )} </OptimizelyFeature> </div> </OptimizelyProvider> ) } } export default App; -
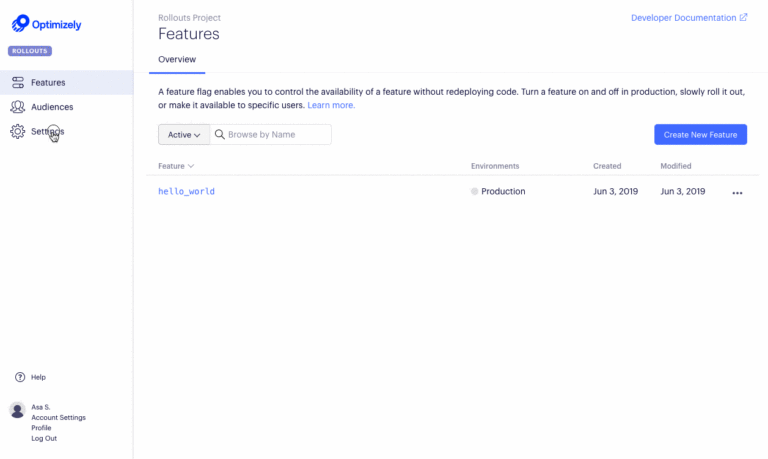
Turn the Feature Toggle on!
If you run your application now, you’ll notice that you did not get the feature. This is because the feature is not enabled, which means it’s off for all visitors to your application.
To turn on the feature:
- Navigate to Features
- Click on the ‘hello_world’ feature
- Toggle the feature on and ensure it is set to 100% (see screenshot below)
- Click Save to save your changes

In around 1 min, refreshing your React app should now show the feature toggled on and you should see “You got the hello_world feature!!”.
You have now successfully launched your feature behind a feature flag, but it’s available to everyone. The next step is to enable targeting to show your feature only to a specific subset of users to enable the true value of rolling a feature out customer-by-customer.
-
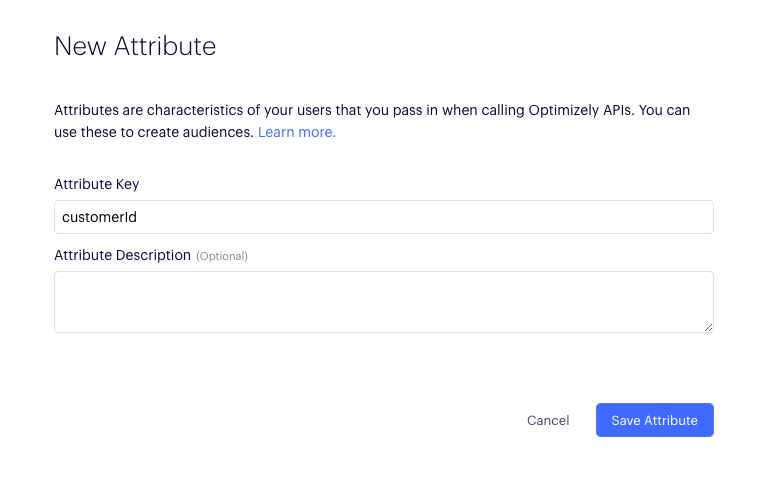
Create an attribute for customerId
To target your feature based on the userAttributes you provided to the OptimizelyProvider component in step 2, you’ll have to create those userAttributes in the Rollouts UI. Do that with the attribute ‘customerId’ to start:
- Navigate to Audiences -> Attributes
- Click ‘Create New Attribute…’
- Name the attribute key ‘customerId’
- Click ‘Save Attribute’ to save your changes
-
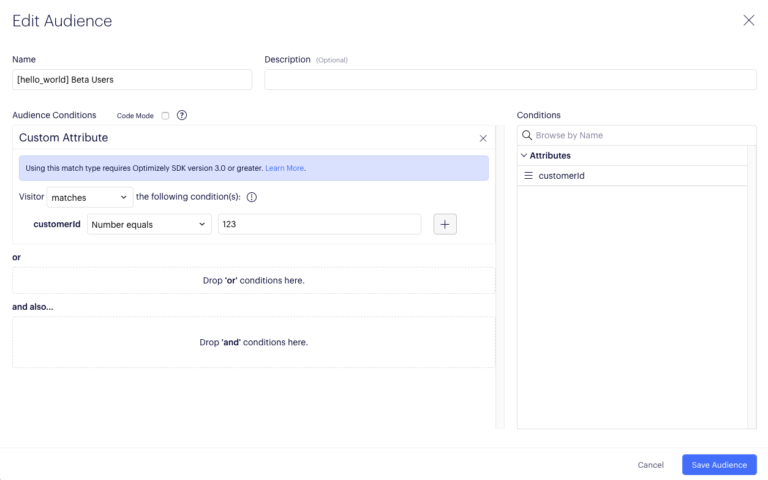
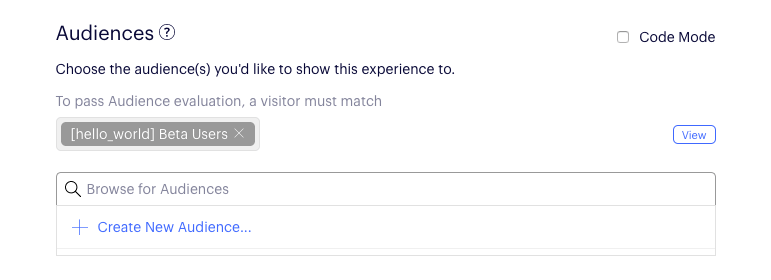
Create and add a beta audience
Now let’s create an audience to indicate which customerIds will get access to your feature.
- Navigate to Features
- Click on your ‘hello_world’ feature
- Scroll down to Audiences
- Click ‘Create New Audience…’
- Name the Audience ‘[hello_world] Beta Users’
- Drag and Drop your customerId attribute into the Audience conditions
- Change the ‘has any value’ drop-down to “Number equals” with the value 123
- Click ‘Save Audience’
Add the audience to your feature by clicking the + button next to your newly created Audience. Then scroll down and click ‘save’.
Now that you’ve added the audience to your feature, the beta is up and running. At this point your feature is only showing for customers with the customerId 123, which is what you provided to the OptimizelyProvider component in the userAttributes prop.
As a test to verify, you can change your customerId to 456, save, and watch as the feature will get turned off because you don’t meet the targeting conditions.
-
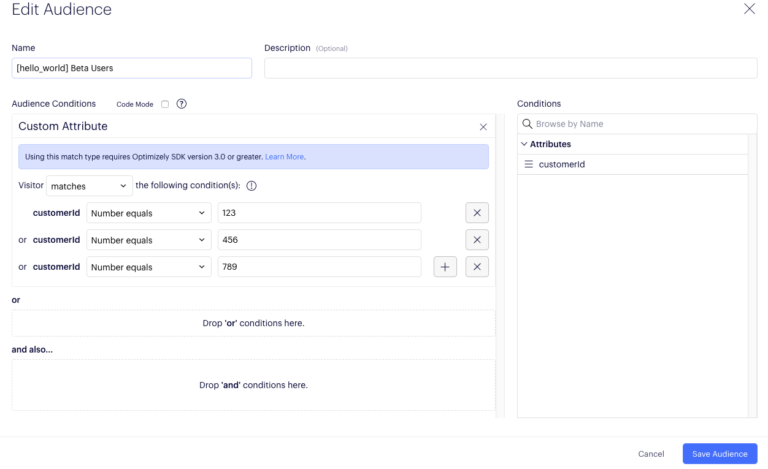
Add users to the beta
To add more customers into your beta audience, edit the audience definition to add or remove users from the beta:
- Click on the “+” sign and save to add beta users
- Click on the “x” sign and save to remove beta users
In the following screenshot example, three customers have been added to the beta. Customers with ids: 123, 456, and 789, will now have access to the ‘hello_world’ feature.
-
Launch the feature
After enabling your feature for enough customers to enjoy the new user experience, you may decide that it’s safe to launch your feature to all customers.
Once you are ready to launch your feature out of beta, follow these steps:
- Remove the audience from your feature
- Ensure the rollout is configured to 100%
- Save the feature
The feature is now available to everyone and you have successfully rolled out the ‘hello_world’ feature customer-by-customer using free feature flags from Optimizely Rollouts in React!
Next steps
Although this blog covered customer-by-customer rollouts, feature flags enable additional use cases like not relying on long-lived feature branches, creating a permissioning system, or enabling product-driven A/B testing.
At Optimizely, we use feature flags for all of these use cases and more.
Hope this was helpful! Give feedback if you have any. I hope I’ve been successful in saving some of your team’s development resources by enabling you to harness the power of feature flags with our free feature flagging product: Optimizely Rollouts.

Asa is the lead Developer Advocate for Optimizely. Previously, Asa was the engineering manager for Optimizely's Full Stack product, responsible for leading multiple...
- Last modified: 12/30/2025 8:11:27 PM